When you offer a large set of extra product options, your product configurators can become confusing and error-prone. That’s where conditional logic comes in.
By structuring complex options intelligently, you can create intuitive, efficient, and engaging product configurators that boost sales and improve customer satisfaction.
In this article we will guide you through everything you need to know about designing complex product configurators with conditional logic, including example strategies and best practices.
What is conditional logic in product configurators?
Conditional logic is a system where the selection of one option automatically influences the availability of other options. In a product configurator it ensures that customers only see compatible choices, preventing invalid product combinations.
Example: selecting “leather upholstery” for a sofa automatically filters available colors to only those offered in leather.
Conditional logic essentially guides the customer through a tailored configuration process, simplifying decision-making and reducing errors.
Why conditional logic matters
Implementing conditional logic in a product configurator isn’t just a fancy technical feature. It helps you guide your customers through the customization process, helping them discover which options can be combined and which ones are not supported.
1: Minimize configuration errors
Invalid or incompatible selections can frustrate customers and cause costly order mistakes. Conditional logic prevents customers from choosing incompatible options, ensuring every configuration is feasible.
2: Speed up decision-making process
When irrelevant options are hidden or disabled, customers can make decisions faster. This not only improves satisfaction but can also reduce bounce rates in online stores.
3: Increase in conversion rates
A smooth, well-structured product configurator reduces friction and cart abandonment. Customers are more likely to complete their purchase if the process feels seamless and personalized.
Structuring complex options for conditional logic
Designing a product configurator with conditional logic requires careful planning and implementation. Here’s a step-by-step approach.
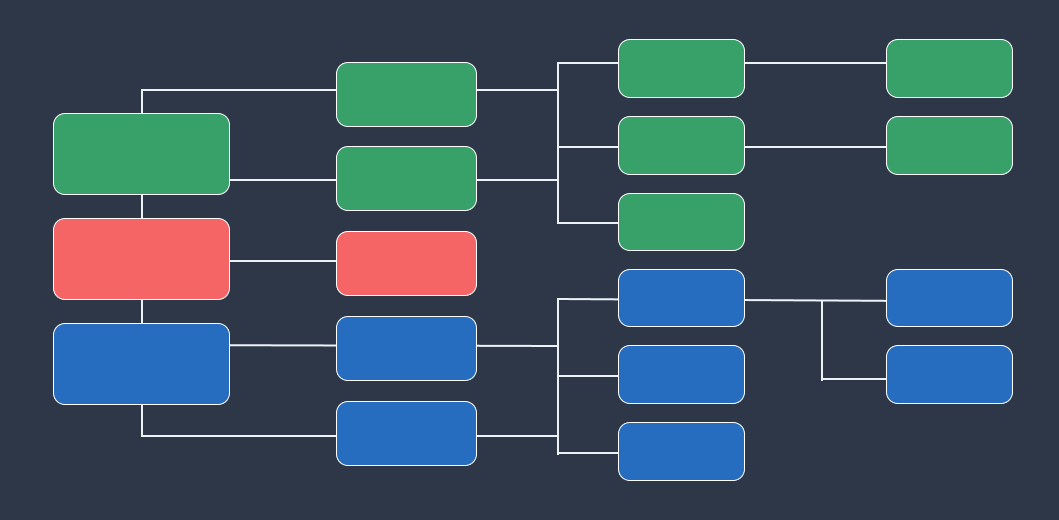
Step 1: Map all product options
Begin by creating a complete inventory of product options, including all variants and add-ons. Organize these into categories:
- Core product types (e.g., sofa models, laptop models, car trims)
- Materials and finishes (e.g., wood types, paint colors, upholstery)
- Functional upgrades (e.g., additional memory, tech features, engine upgrades)
- Optional accessories (e.g., cushions, carrying cases, special attachments)
Using visual mapping tools like flowcharts or spreadsheets can help visualize dependencies and ensure no options are overlooked.
Step 2: Define dependencies and rules
Once you have all options listed, define relationships between them. Consider the following types of dependencies:
- Mutually exclusive options
Only one option can be selected from a group (e.g., choosing between two engine types). - Dependent options
Some choices only appear when a certain feature is selected (e.g., choosing a convertible roof enables specific roof materials). - Incompatible options
Certain combinations must be blocked (e.g., certain color options not available with a particular material).
Document these rules carefully, as they form the blueprint for the configurator’s logic engine.
Step 3: Implement tiered logic
For complex products with many interdependent options, a tiered approach is essential:
- Primary selection
The main product type or model - Secondary options
Features that depend on the primary selection - Extra add-ons
Optional enhancements dependent on prior choices.
This structure prevents overwhelming the user by introducing options gradually, rather than showing all possibilities at once.
How to add conditional logic in WCB Configurator Builder

Now, let’s zoom in on WCB Configurator Builder and how you can leverage its conditional logic add-on to implement the structure you’ve designed.
What Is WCB Configurator Builder?
WCB is a WordPress plugin (also compatible with WooCommerce) that allows you to build powerful and visually rich product configurators. It includes features like drag-and-drop form building, image layering, multi-step forms, and conditional logic.
Setting up conditional logic in WCB
Install and activate the conditional logic add-on
- Purchase or download the WCB Conditional Display add-on
- Upload and activate it on your WordPress site, along with the base WCB plugin
- Make sure WCB itself is active and configured (you should already have some form fields or choices defined)
Enable conditional logic in your block
- Go to the WCB editor for your configuration form.
- For each block (this can be a single field, a group of fields, or a repeater), check the “Set display rules” box
- Once enabled, you can start adding your rules.
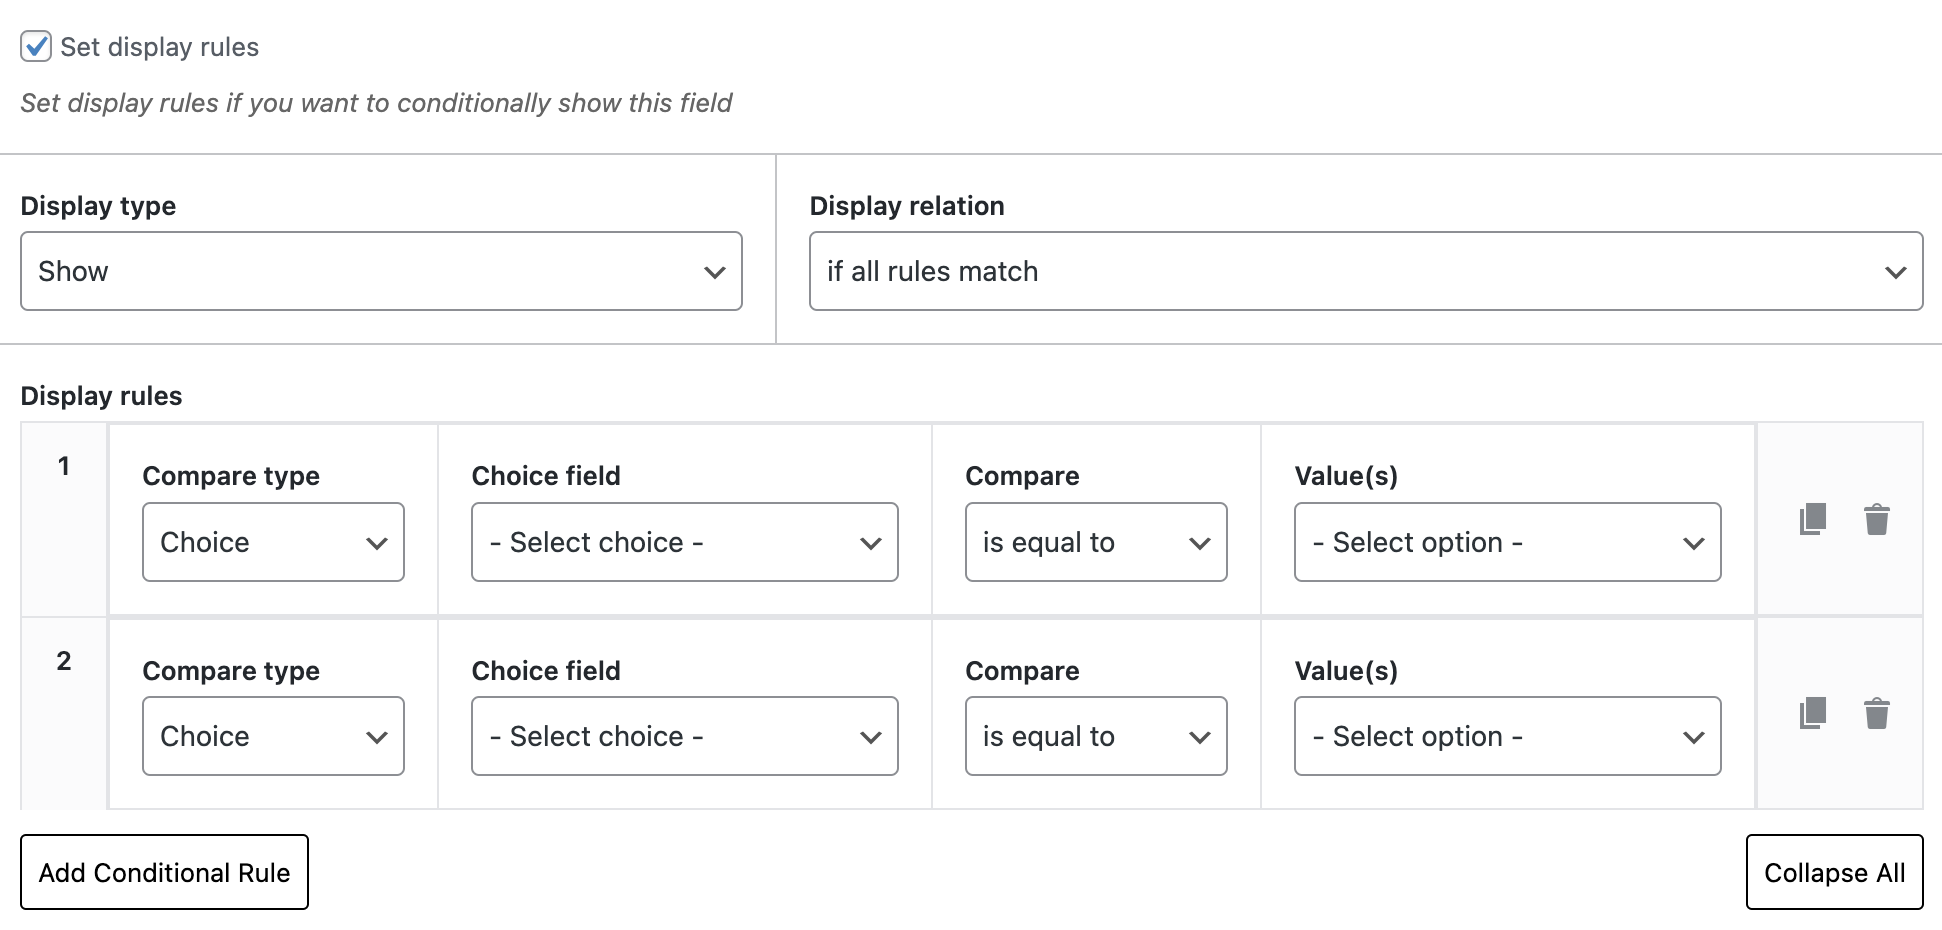
Create conditional rules
Inside the block’s conditional logic settings, define the rules that determine when this block will show, hide, enable, or disable. WCB lets you do two types of conditional behavior:
- Field-level rules: show or hide entire fields or field groups.
- Option-level rules: instead of hiding a whole field, you can hide or disable specific options within that field
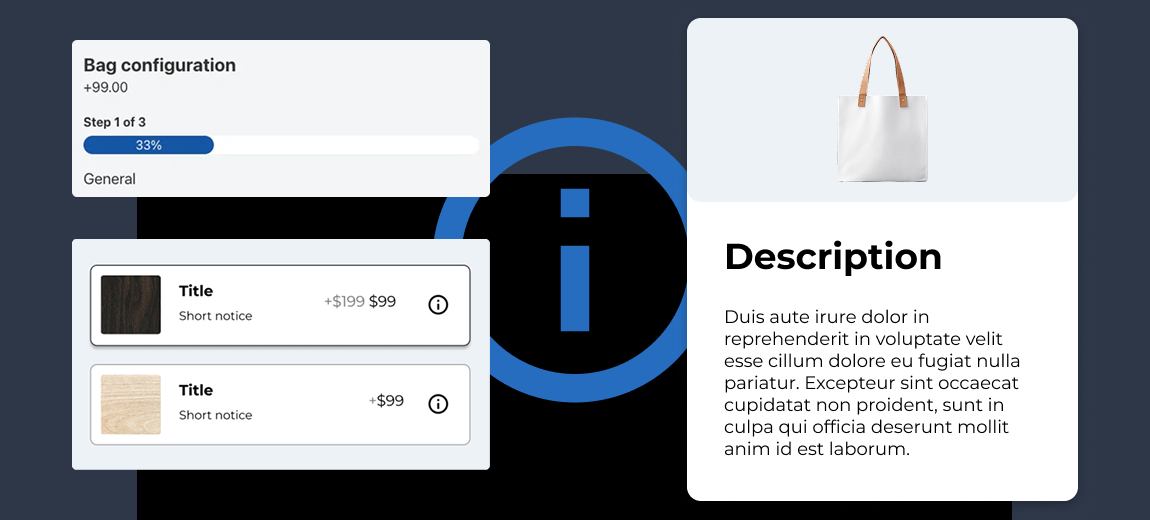
For example, if you have a dropdown field “Material” with options “Fabric,” “Leather,” and “Velvet,” you can:
- Hide “Leather” and “Velvet” if the user hasn’t selected a certain base model.
- Disable “Velvet” (make it visible but not selectable) based on other choices
Decide how to handle “invalid” options
WCB gives you control over how “invalid” (incompatible) options are handled:
- Hide them entirely when they don’t match the condition.
- Keep them visible but disabled so customers can see that such options exist but cannot select them. This is helpful if you want to educate customers about why some options are not available in their configuration path.
Persist conditional state
Finally, WCB provides a setting: “remember conditional options.” When turned on, WCB remembers the last selected option for a block when it becomes visible again.
This is useful in multi-step product configurators, where fields may hide and reappear depending on earlier choices.
Test your conditional logic
After you define your rules, go through the configurator as a customer would. You can use WCB’s preview or a live product page to check the real behavior. While testing, select various combinations to verify that:
- The correct fields or options appear or disappear;
- Disabled options behave as expected;
- Selections made before hiding a field are remembered (if using the “remember” setting).
Once confirmed your logic is working correctly, you can publish the configuration form. Make sure to run a final acceptance test (ideally with someone who didn’t build the logic) to catch any unexpected behavior.
Example of using conditional logic in WCB
To make this concrete, here’s a hypothetical example for a custom backpack product:
- Backpack size: Small, medium, large (layer 1)
- Material: Canvas, leather, waterproof fabric (layer 2)
- Add-on: Laptop compartment, extra pocket, rain cover (layer 3)
Conditional logic setup:
- Material depends on size:
- If small is selected, hide leather (canvas and waterproof visible).
- If large is selected, all materials visible.
- Add-ons depend on material:
- If canvas is selected, only extra pocket and rain cover are visible.
- If leather is selected, laptop compartment is enabled, rain cover is shown but disabled.
- If waterproof fabric is selected, enable all add-ons.
- Remember selection:
- When user selects large > leather > laptop compartment.
- User changes size to small, so leather gets hidden. But when they switch back to large, laptop compartment is still selected because of the “remember conditional options” setting.
This kind of setup makes customers’ journeys much more logical and prevents them from choosing combinations that don’t make sense or you can’t fulfill.
Best practices for conditional logic in product configurators
To maximize effectiveness, follow these best practices:
- Keep it simple
Avoid unnecessary complexity. Present only options that matter at each step. - Prioritize popular options
Highlight the most common configuration options to guide new customers. - Use clear labels
Options should be easy to understand. Avoid technical jargon. - Provide context
Explain why certain options are unavailable when blocked. You can use the field descriptions to explain why certain options don’t go well together. - Maintain flexibility
While logic prevents invalid selections, don’t overly restrict user creativity.
Conclusion
Structuring complex options in product configurators with conditional logic is both an art and a science. When done correctly, it simplifies the user experience, prevents errors, and drives conversions.
Key takeaways from this article:
- Map all options and their dependencies before implementation.
- Define clear rules for mutually exclusive, dependent, and incompatible options.
- Implement tiered logic to prevent overwhelming your customers.
- Use visual feedback, real-time previews, and tooltips to guide customers.
- Test thoroughly and optimize for mobile performance.
Ready to start building complex configuration forms in WCB? Don’t forget to get your hands on our amazing conditional logic add-on.