Creating linked product options in WooCommerce can significantly enhance your store’s user experience and sales potential.
With the help of WCB Configurator builder plugin, you can seamlessly link individual products together as options, offering a flexible and dynamic shopping journey for your customers.
In this guide, we’ll walk you through how to create WooCommerce linked product options using WCB, why it’s useful, and how to optimize it for maximum conversions.
What are linked product options in WooCommerce?
Linked product options allow you to group separate WooCommerce products (with their own SKUs, stock, prices, and settings) under a unified interface.
Instead of relying solely on variable products, linked product options give you more control, better SEO, and easier management.
Example: A store sells the same t-shirt in red, blue, and green. Each color is its own simple product. Using linked product options, customers can switch between these products as if they were variations.
Why use linked product options instead of variable products?
- SEO benefits: each variation gets its own product page, helping improve organic rankings.
- Inventory control: manage stock levels per product instead of shared variations.
- Custom product page layouts: different descriptions, images, and pricing per product.
- Better user experience: customers can quickly switch between linked options.
How to create linked product options with WCB
Step 1: Install and activate WCB Configurator Builder plugin
- Navigate to your WordPress dashboard.
- Go to Plugins > Add New.
- Search for WCB
- Click Install Now, then Activate.

Step 2: Create individual WooCommerce products
Create each product that you want to link as a separate simple product.
For example:
- Product 1: “T-Shirt – Red”
- Product 2: “T-Shirt – Blue”
- Product 3: “T-Shirt – Green”
Each should have:
- A unique title
- Separate images
- Individual SKUs
- Distinct prices or stock levels
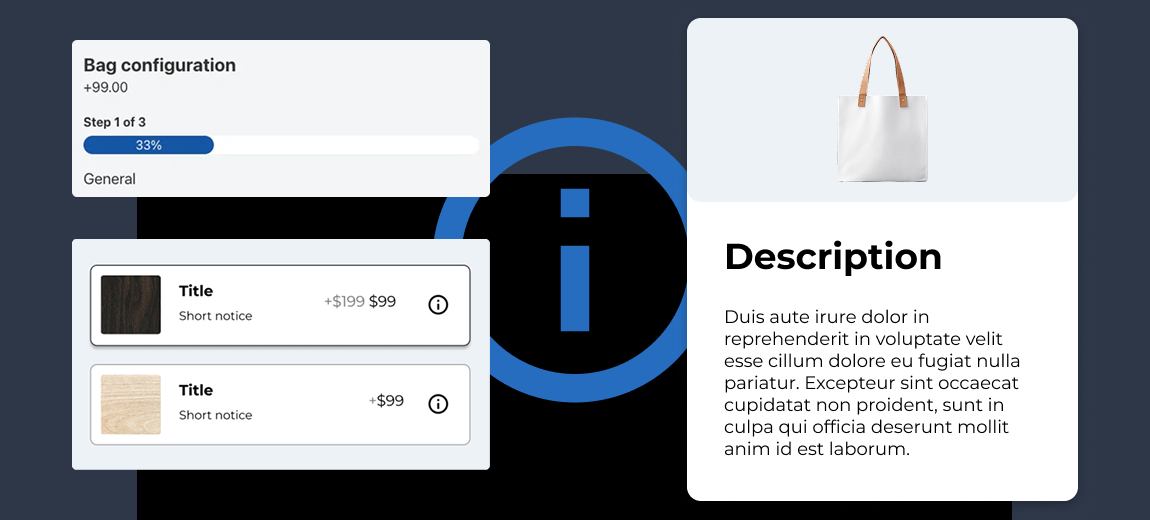
Step 3: Create a WCB choice field
Head over to WCB > Choices and create a new choice
Use a WCB choice field like “Color” to group the extra product options and link the product pages together.
- Go to WCB > Choices
- Create a new choice (e.g., “Color”).
- Set type to URL and choose template of your likings (e.g., “Swatches”)
- Add options (e.g., Red, Blue, Green).
- For each option, enter the product URL of the product page
- Save the choice

Step 4: Link products via WCB configuration
With our choice field in place, we can create new configuration and assign it the the various product pages:
- Go to WCB > Configurations and add a new configuration
- Add your new Choice to the configuration form
- Scroll down to Configuration data and change display rule to Product
- Select the created simple products to display configuration on
- Save the configuration

Step 5: Test and publish
Now that the configuration is published, head over to your simple product pages. You should see the custom options and when you click on the option, you should be redirected to the product page.
Final thoughts
Using WooCommerce linked product options with WCB gives you the best of both worlds: SEO-friendly product pages and a variation-style user interface.
It’s perfect for stores selling products in multiple colors, sizes, styles, or configurations, without the limitations of standard variable products.
If you’re serious about store performance and search visibility, implementing linked product options is a smart move.
FAQ
Is WCB compatible with Elementor or Gutenberg?
Yes, WCB works with both. You can insert configurator products on any page or template. Or transform WooCommerce pages by linking the configuration to a WooCommerce product.
What is better: variable products or linked product options?
Linked product options provide better SEO and control, while variable products are easier for small catalogs. Use what fits your store size and strategy,