
If you’re building interactive 3D product configurators with WCB Configurator Builder on your WordPress site, exporting your 3D models in the GLB format from Blender is a crucial step.
The GLB format is fully compatible with WCB, allowing you to showcase customizable 3D products with real-time materials, textures, and animations.
This guide covers how to create and export 3D GLB models in Blender optimized for WCB Configurator Builder, helping you deliver engaging, high-quality product configurators that boost user experience and sales.
Why GLB models are perfect for WCB Configurator Builder
WCB Configurator Builder supports GLB files natively, making it easy to:
- Load fully textured and shaded 3D models
- Use real-time material switching and customization
- Animate parts of the model for interactive configurators
- Ensure fast loading times and smooth performance on your WordPress site
Step 1: Open your 3D model file in Blender
Open Blender and import your product model:
- Head over to File > Import > glTF 2.0 (.glb/.gltf).
- Select your model
- Import
Step 2: Prepare your model for export to WCB
Before we export the model, make sure your model is optimized for WCB
1: Apply transforms
First, we are going to apply transforms and center the model so it shows up correctly in the 3D viewer.
Select your model and press Ctrl + A > All Transforms (location, rotation, scale) so WCB reads correct positions and sizes.
With our transforms in place, the next thing we want to do is make sure the model is in the center of the space. Otherwise the rotation could be off-centered in the 3D viewer, which will have a bad impact on the 3D experience.
Select your model and press “G” and then “X”, “Y” or “Z” on your keyboard to bring the model to the center of the screen.
Finally, select all faces and recalculate normals outward (Shift + N) to avoid shading issues in WCB.

2: Check names
Name objects and materials clearly to easily identify parts inside WCB Configurator Builder when assigning options.
You will be using the names for nodes and materials again, so it is important to name your objects well.

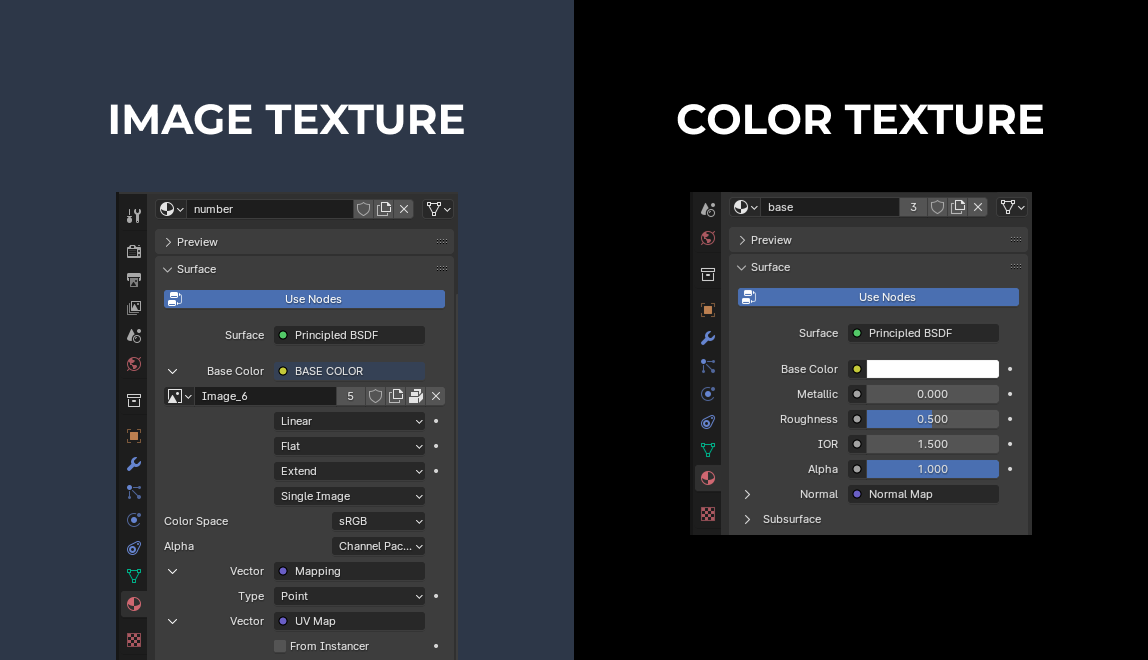
3: Check materials
Make sure you are using the correct material types to support updates with the WCB configurator builder
If you want to update materials by using image textures, you need to make sure your material is also set to image texture.
And if you want to update materials based on color, make sure you are using color textures.
Also make sure you are using textures of type “Principled BSDF”. Other types, like Glass BSDF are not supported by the viewer yet. You can create the glass effect on Principled BSDF as well using IOR and Volume settings.
If you want to support custom image uploads or custom text on the 3D model, you can best add an additional layer on top of the 3D model. This functions as a reserved space to put the image or text on.
4: Clean up
Finally, remove all excess nodes and helper objects from the model to minimize the 3D model size.
Ideally you want to keep your 3D model size below 10 MB to ensure fast configurator performance
Step 3: Export your 3D model as a GLB file
- With your model selected, go to File > Export > glTF 2.0 (.glb/.gltf).
- Configure export settings:
- Choose Format: GLB Binary (.glb) for a single-file upload.
- Enable Include > Selected Objects if exporting parts of a scene.
- Check Include > Materials and Animations if applicable.
- Save your file with a descriptive name for easy management.
- Click Export glTF 2.0.

Step 4: Import your GLB model
- In your WordPress dashboard, go to WCB > Configurator > Add New (or open an existing configuration)
- Open up the Visuals tab
- Upload your exported GLB model

Step 5: Build the configurator
To complete the configurator, head over to WCB > Choices or input fields and define interactive parts, materials, and options using WCB’s intuitive interface.
Finally, link your model’s materials or object groups to customizable options for seamless user interaction in WCB > Visuals.
Tips for best results with WCB
- Use Principled BSDF materials in Blender to ensure WCB displays realistic textures and lighting.
- Keep polygon counts reasonable for smooth performance on websites.
- Organize your model parts and materials clearly so you can easily assign options inside WCB.
- Test your GLB model in WCB’s 3D Sandbox before publishing to ensure compatibility.
Benefits of using Blender and GLB models for WCB
- Interactive 3D product customization with real-time previews
- Seamless integration between Blender’s creation tools and WCB’s configurator platform
- Optimized web delivery with compact GLB files that load quickly
- Supports animations to enhance product presentation
- Easy updating: just export a new GLB and replace it in WCB when your product changes
Final thoughts
Blender and WCB Configurator Builder make a powerful duo for building immersive 3D product configurators on WordPress.
By mastering the creation and export of GLB models in Blender, you can bring your products to life with stunning customization options that captivate your customers.